
Being able to save full length screenshots of webpages is very useful. A quick scan of the Mac AppStore reveals several apps at different price points that fill this niche but I’m going to show you how you can achieve this functionality for free on the Mac. In my example I will show you how to capture a full-length image of the current page being viewed in Safari.
This is an image of the kind of thing we’re aiming to create.
To create the image we will be using Webkit2Png – a command line tool created by Paul Hammond, and to make this tool available from Safari, we will be using Automator which comes installed on every Mac.
1 First of all download a copy of webkit2png to the desktop of your Mac. Download Webkit2Png. Save this file as ‘webkit2png‘ without any file extension.
2 If you are using Mac OSX 10.11+ (El Capitan), you will need to make a small edit to the script before can continue:
Open webkit2png in your chosen Text Editor / IDE and search for the line 422:
app = AppKit.NSApplication.sharedApplication()Add the following code before line 422:
# Handles ATS HTTPS requirement introduced in El Cap
    if options.ignore_ssl_check:
        AppKit.NSBundle.mainBundle().infoDictionary()['NSAppTransportSecurity'] = dict(NSAllowsArbitraryLoads = True)
This extra code is to get past the App Transport Security error that El Capitan throws when you request a non-https site.
Now save the file.
3 Now you need to move this file to you /usr/bin/local/ directory. To do this, open Terminal.app that resides in your Utilities directory. If you don’t know where the Utilities directory is located you can open it directly by using the keyboard shortcut ‘⌘⇧U‘ in the Finder. Once Terminal.app is open, you can move the Webkit2Png file from your Desktop to to your /usr/bin/local/ directory with the following command:
sudo mv ~/Desktop/webkit2png /usr/local/bin/You will be asked to enter your account password, and then the file will be moved to the /usr/local/bin/ directory.
4 The next thing to do is set the correct file permissions on the webkit2png script. Again using Terminal.app, enter the following command to update the permissions on the file:
chmod a+x /usr/local/bin/webkit2png5 At this point, webkit2png is ready to use. If you’re happy using the command line, you can simply capture webpages by typing the following command in to Terminal.app:
webkit2png https://www.midwinter-dg.com/my-blog --width=1280 -F --delay=5 --ignore-ssl-checkThis command will save a full length screenshot of the url https://www.midwinter-dg.com/my-blog, with a width of 1280px. The flag -F is for full width, the delay to ensure the page and any scripts have time to load and the –ignore-ssl-check is to ensure non https pages will be saved.
However, we want to set up Automator to save a screenshot of the current page directly from Safari to the Desktop…
6 Open Automator.app and select ‘Service‘ from the Document type menu. Above the main workflow panel of the Automator app you will see some dropdown menus that read as follows:
‘Service receives text in any application‘.
Modify this to read:
‘Service receives no input in Safari‘.
Next, from the Library on the left select Internet, and then drag the ‘Get Current Webpage from Safari‘ in to the main workflow panel.
7 Now, from the Library select ‘Utilities‘ and drag the ‘Run Shell Script‘ action in to the workflow panel below the previous action. Modify the ‘Pass input’ menu in the ‘Run Shell Script’ action to read ‘as arguments’, and edit the contents of the action to read:
/usr/local/bin/webkit2png $@ --dir=/Users/***/Desktop/ -w 1280 --clipwidth 1 -F --delay=5 --ignore-ssl-checkwhere *** is the name of your user account Home folder.
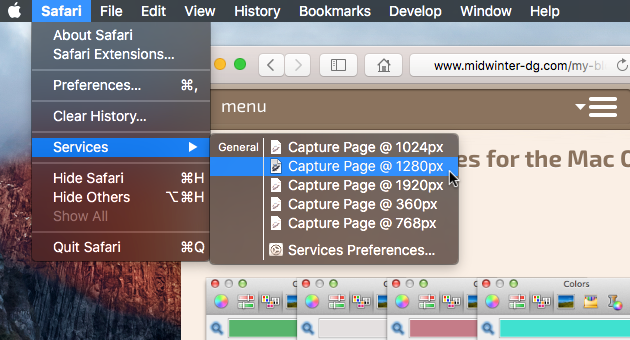
Then save the workflow. In the example above, the screenshot is being saved with a width of 1280px, so I named it ‘Capture Page @ 1280px‘. I also created services for several different widths.

8 To use the new service, open Safari, open a webpage and then from the Safari menu select Services and choose your new service. After a short delay you should see the screenshot saved to your desktop.
If you want to play around with the options available, open Terminal.app and type
webkit2png -- helpto see a full list of all available options.
Enjoy!


