
Sometimes when you’re working you just need to quicky view the current page as it would appear on mobile. Maybe you already have the page + web inspector open and you don’t want to waste time switching to Safari’s Responsive Design mode. Nevertheless you’d like to view and interact with the page as if on mobile…
…Here’s how you can do just that, opening the current page in a floating popup window with a custom size and user agent!
To achieve this you can use Automator to set up a service which will be accessible from the “Services” sub-menu of the main Safari menu.
1 Open /Applications/Automator and when the main window opens, select “Service” as the type of document that you want to create.
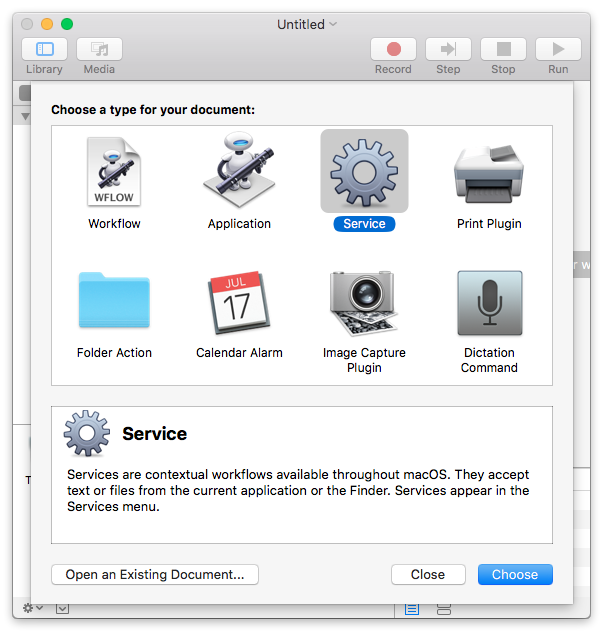
2 Once selected you can start constructing the workflow. Above the main workflow area (where is says “Drag actions or files here to build your workflow”) you should see a panel with “Service recieves” and several controls. Modify the controls to read “Service recieves no input in Safari”.

3 Now, from the Library of actions in the left-hand column select “Internet”, and the from the second column, drag the “Get Current Webpage from Safari” and “Website Popup” actions into the main workflow area.

4 Finally in the “Website Popup” action choose a size and user agent – I’ve selected 375x667px for iPhone7 and the iPhone user agent – then save the workflow.
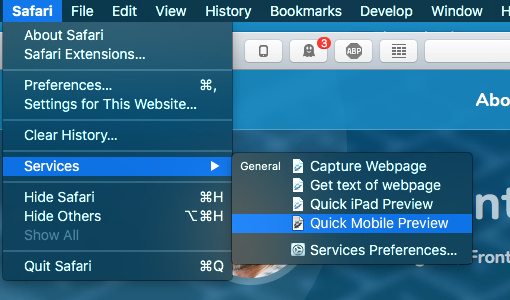
You should now be able to preview the current tab in Safari by selecting your new workflow from the “Services” sub-menu of the main Safari menu.
If you want to try this with a different browser it should be possible with just a little bit of extra work. I haven’t tried it myself but it should work if you replace Safari in stage 2 with the browser you want to use, and replace the first action “Get Current Webpage from Safari” with the “Run AppleScript” action. You will then need to write an AppleScript to get the current URL from the browser window – but maybe that’s something for another post…


